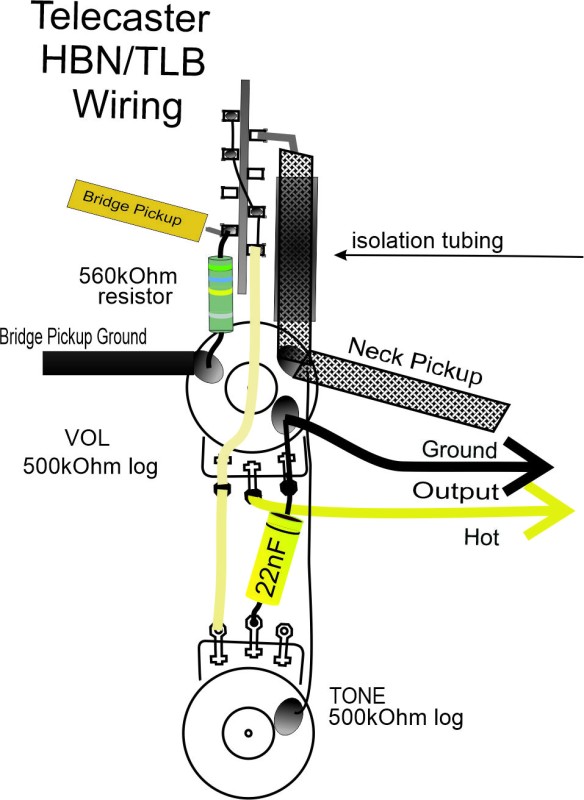
Here you find recommendations and tips for installation and wiring of your pickups.
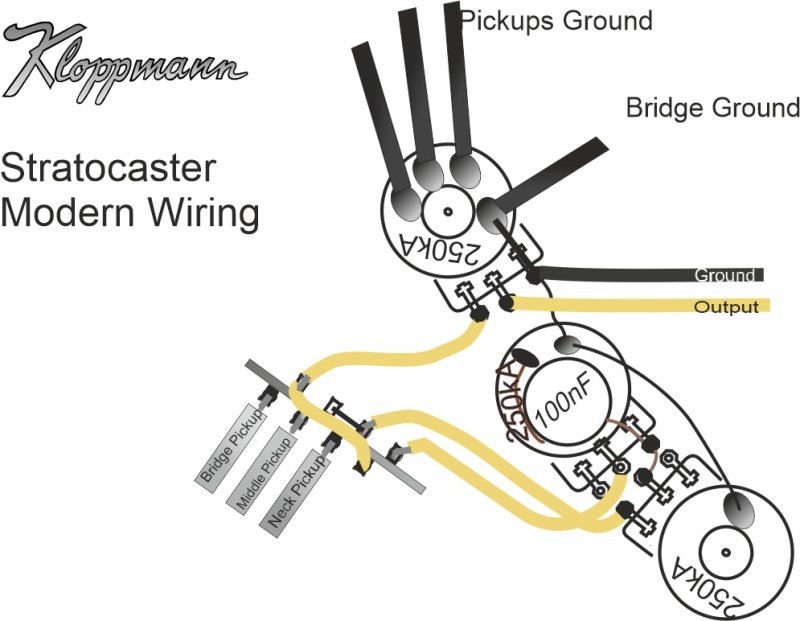
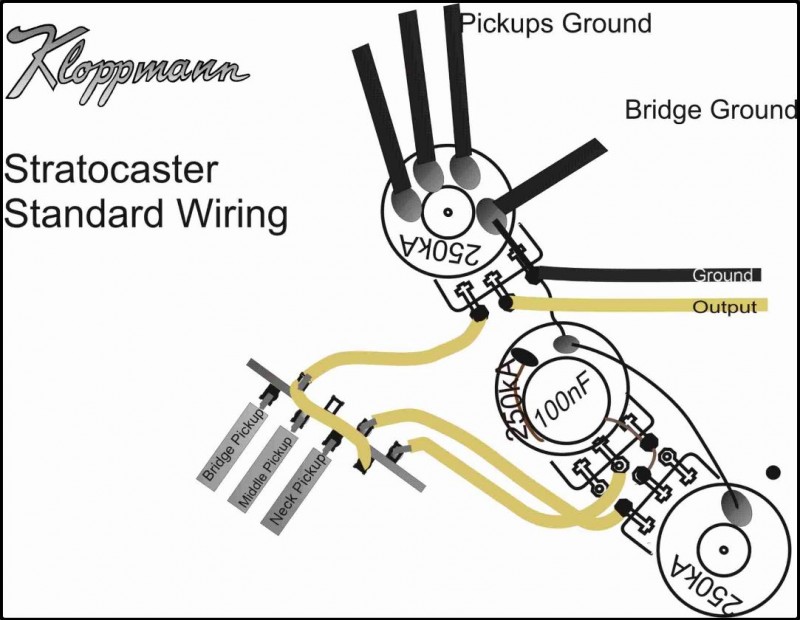
1) With every set there is some "Pushback" Cloth Wire included. I recommend using the entire electrical system of the guitar with these cables. Above all, the connection from the VOL Poti to the output socket is important!
2) The attached capacitor replaces the existing one on the sound panel.
3) The values of the potentiometers should always be measured, because the higher the value of the potentiometer, the lower the damping of the characteristic of the pickup. We got used to the sound of using Strat and Telepickups with 250k ohms, so this sound experience matches our listening habits and we are happier. The tolerance is between 245kOhm for softer sounds and 270KOhm for more bite in the high mids. Of course, this is also a taste issue. I'm always very puristic about these things and stick to my experiences with the late '50s and early' 60s guitars.
4) Often I am asked how high the pickups should be screwed to the strings. My advice is always: try it out! Of course, this adjustment is very important, but each guitar is as different as the tastes of the users. I prefer to lower the neck pickup a bit to get the tone a bit thinner. At the bridge, I always adjust the height for sound and clipping behavior of the amp. In principle, I proceed as follows: The deep E string on the highest collar grab (21 o. 22) Then adjust all 3 pickups on 3mm distance. Then set the highest string exactly and at 2 mm distance. This setting is then the starting point for a fine adjustment by ear.
5) Attention !! Strat pickups are highly sensitive! When installing, make sure that the hose sections are approximately the correct length. If a pickup must be screwed very high out of the pickguard, it is essential to shorten the length of the hose. Otherwise, the pressure between the upper and lower bobbin plate is too high, which can destroy the original sound of the pickup.
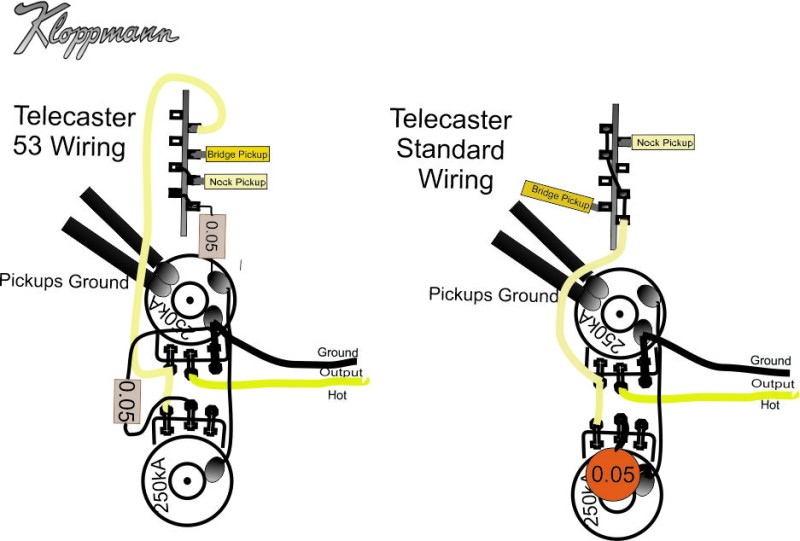
As already assumed, the enclosed cables are intended for the further wiring of the electrical system. It does not always have to be replaced, but it is more beautiful. For some instruments, this also leads to a real sound profit. The attached capacitor replaces the existing one on the Tone panel. Again, not a must, but often you win here too! In principle everything has to be exchanged one to one. In the pickup wiring, the black leads come to ground, in this case to the housing of the Vol Potis. Weiss vom Hals Pickup to the switch where the predecessor was connected, just like the yellow wire from the bridge pickup.
If a meter is in the house, it is recommended to determine the actual values of the potentiometers. To do this, after the pickups and capacitors have been removed, measure the resistance between the outer terminals. The value should be between 245 and 275. The TL 50 and the BC49 sounds best with slightly higher values (265 to 275).
If these values are not reached, you should replace the potentiometers or tune at too low values. Tuning requires some skill but often spares a lengthy search. To do this, disassemble the potentiometer and carefully polish the slideway. For this you take fine sandpaper (1000 grit) or a polishing fleece and rubs off of the web. This increases the DC resistance. The whole thing with connected measuring device. Then the value can be adjusted very precisely.
1) Here is reformulated, but better than nothing! Have fun!
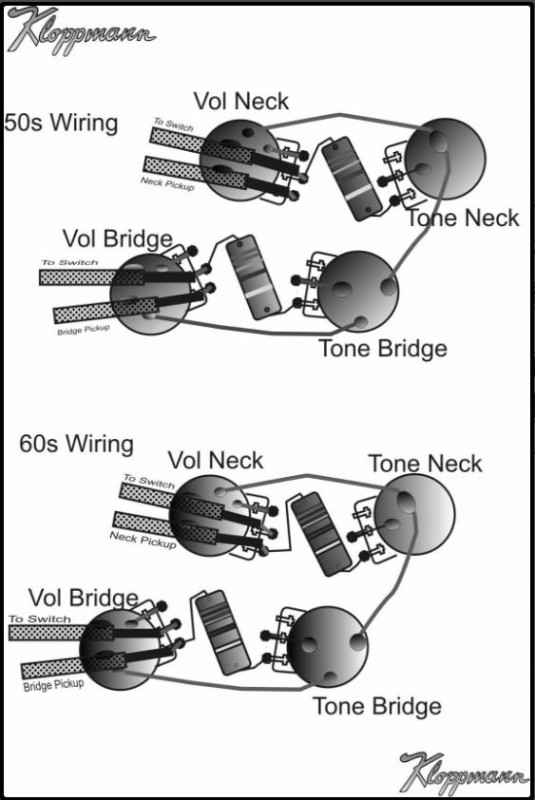
2) Each humbucker comes with a replacement capacitor. At the moment it is a product called Mallory 150. This capacitor achieves a respectable result at a relatively low cost! Attention!! Experimenting with capacitors can be addictive and often ends with buying an original Bumble Bee pair from the 50s (0.022mF / 400V red / red / orange / blue20% / yellow!). These things are very hard to come by and become more expensive. These are available as PIO and Mylar versions. The PIO makes the old compressed dusty sound. Every PIO sounds different. To perfectly sing a Les Paul, you need a small selection.
3) The supply cables of a vintage humbucker are recognizable by their "Braided Shield". These cables are true garbage according to modern HiFi considerations. In this case, they give us exactly the right capacity to color the sound of the humbucker coils as we hope. Of course, the length of the cable is of crucial importance! Long cable = High capacity / Short cable = Low capacity. This means in our case (electric guitar) when shortening the connection cable, the sound is brighter and less centered. To test you can first use the full length and then gradually push the shield back.
4) The values of the potentiometers should always be measured, because the higher the value of the potentiometer, the lower the damping of the characteristic curve of the pickup. We got used to the sound of humbucking with 500k ohms, so this sound experience matches our listening habits and we are happier. When Halspickup can tolerate a slightly higher value well (up to about 600kOhm). The neck pickup sounds a bit tighter, less spongy. When bridge pickup I tolerate values between 500k and 450kOhm, not above and above all not below (no 300kOhm!). Of course, this is also a taste issue. I'm always very puristic about these things and stick to my experiences with the late '50s and early' 60s guitars.
5) To pickup height adjustment: Often I am asked how high the pickups should be screwed to the strings. My advice is always: try it out! Of course, this adjustment is very important, but each guitar is as different as the tastes of the users. I prefer to lower the neck pickup a bit to get the tone a bit thinner. At the bridge, I always adjust the height for sound and clipping behavior of the amp. I do it like this: Grab the low E string at the highest fret (22.) Then adjust the pickups to 3mm distance. Then set the highest string exactly and at 2 mm distance. This setting is then the starting point for a fine adjustment by ear. But also the adjustment of the pole screws is helpful to perfect the sound. If you screw the screw into the coil, the attack becomes softer, you screw it out, it becomes clearer. Try the following: Screw all 6 pole screws and also the screws of the HB height adjustment a quarter turn to the right (clockwise), then listen. Then every 8 half a turn to the left, listen again. Then you have an idea of what is possible at this point.
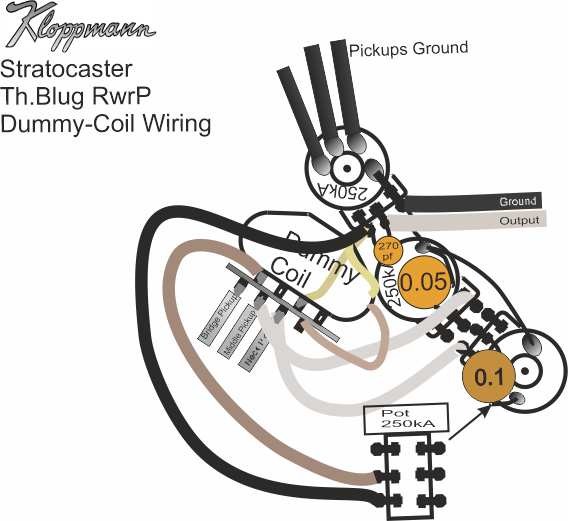
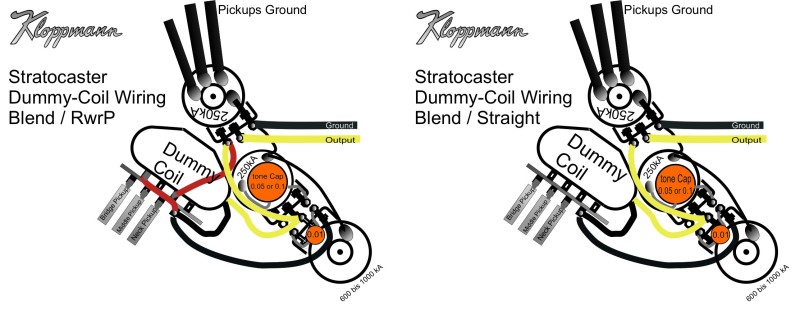
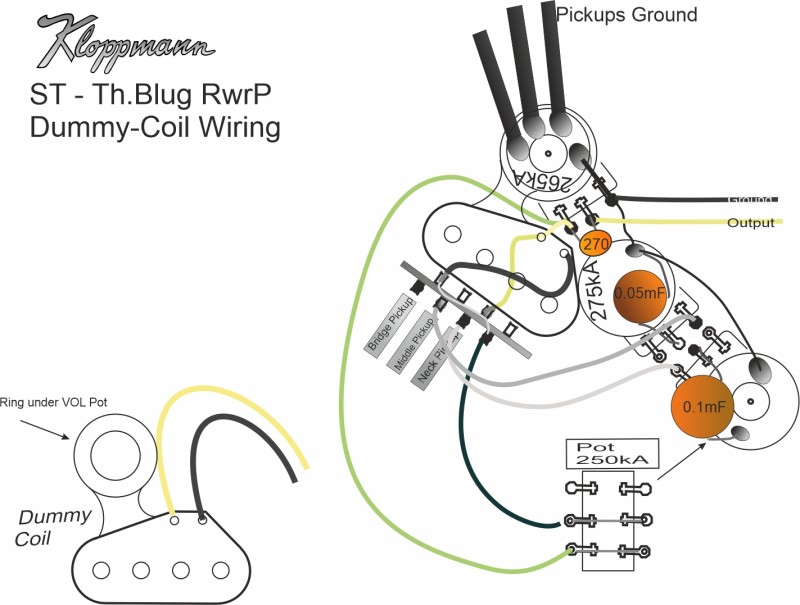
The Dummy Coil is available separately and as a DC kit. The DC kit includes a dummy coil and a 250 kOhm push / push potentiometer, as well as the circuits shown here. When ordering, please specify for which pickup model the dummy coil should work. Without information you get the DC matching the ST60.
Two different ways to wire a dummy coil:
BLUG wiring: (picture right) for a RwrP set. Neck and bridge pickup are "drowned" - the intermediate positions are hum-free and the DC gets by 5-way switch a bypass. also the Mittelpickup, this is not to "drone" in this circuit
Straight wiring: (pictured left) for a straight set. Here, the tone switching level can be used as before.
In principle, the dummy coil is connected in series with the pickup signal. The dummy coil is in construction and in the winding sense like a Stratpickup. It is mounted with the bottom plate to the pickguard and is thus rotated 180 ° against the pickups (neck and bridge pickup on the RwrP set). The pickup signal (white cable) goes into the coil start of the dummy coil (black cable). All bypass circuits bypass the dummy coil (short circuit) or take it completely off the signal through a 2 x to switch.
Lately I've been making an adjustable bypass circuit with a potentiometer more and more often. Here are high values between 500k and 1m announced, otherwise the coil hums less. You can also work with a Treble Bleed circuit here, similar to the VOL Poti.
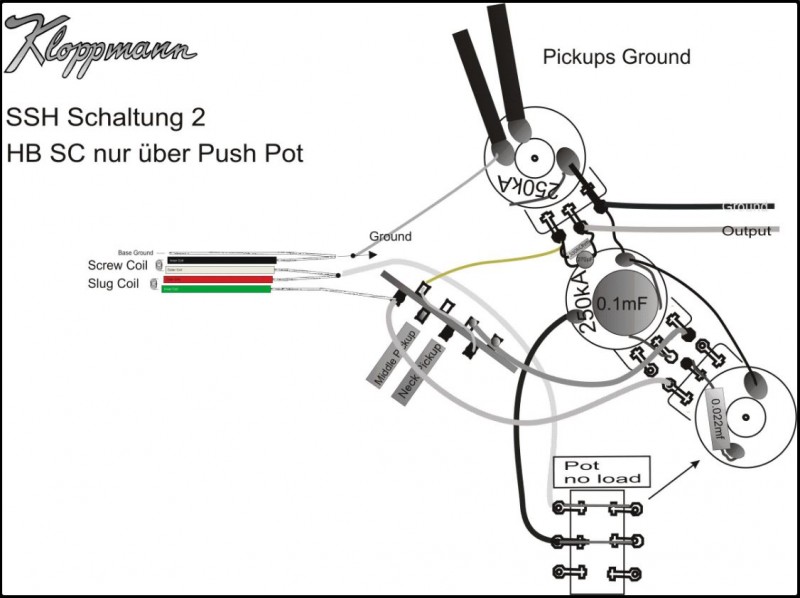
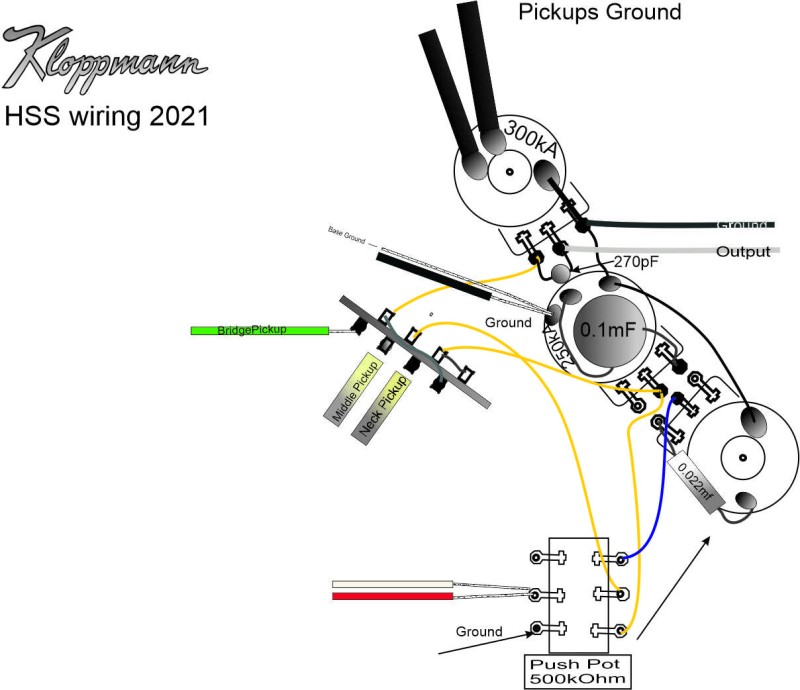
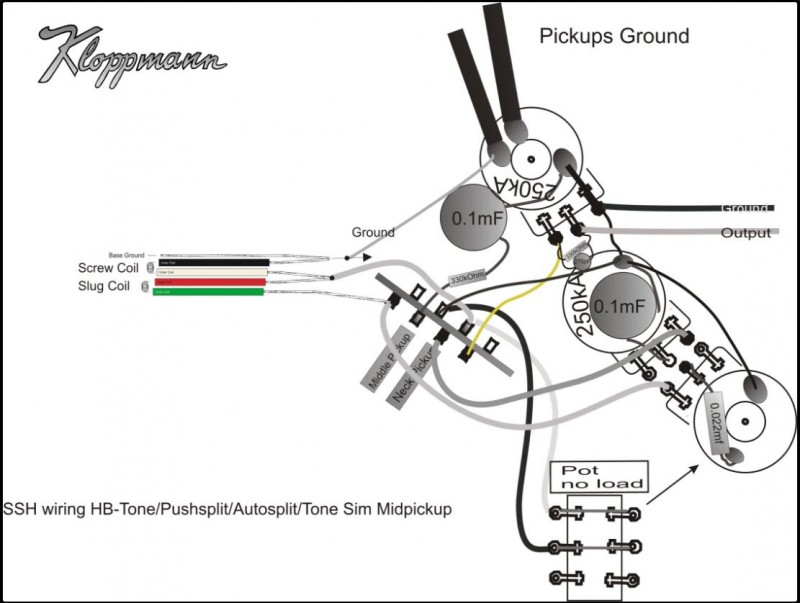
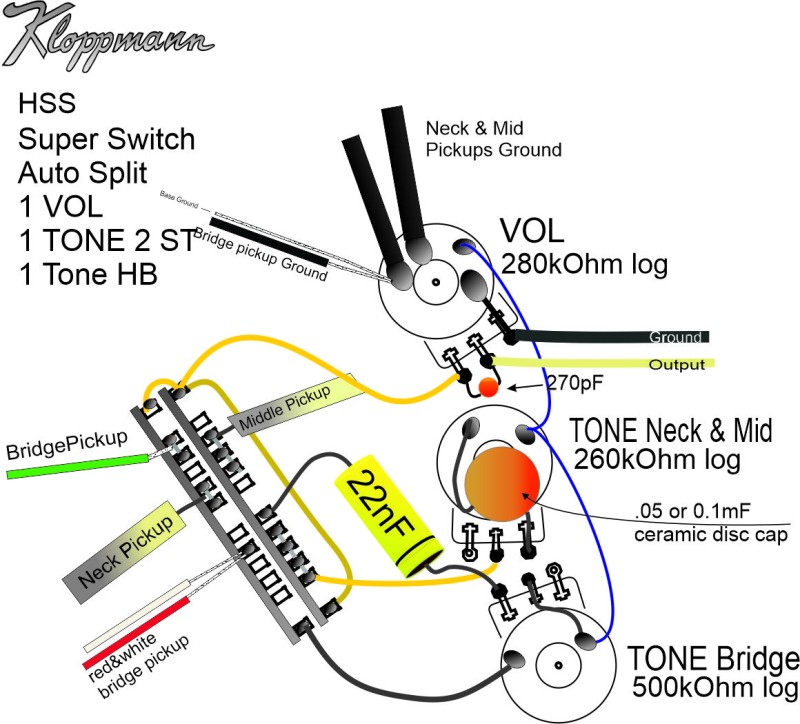
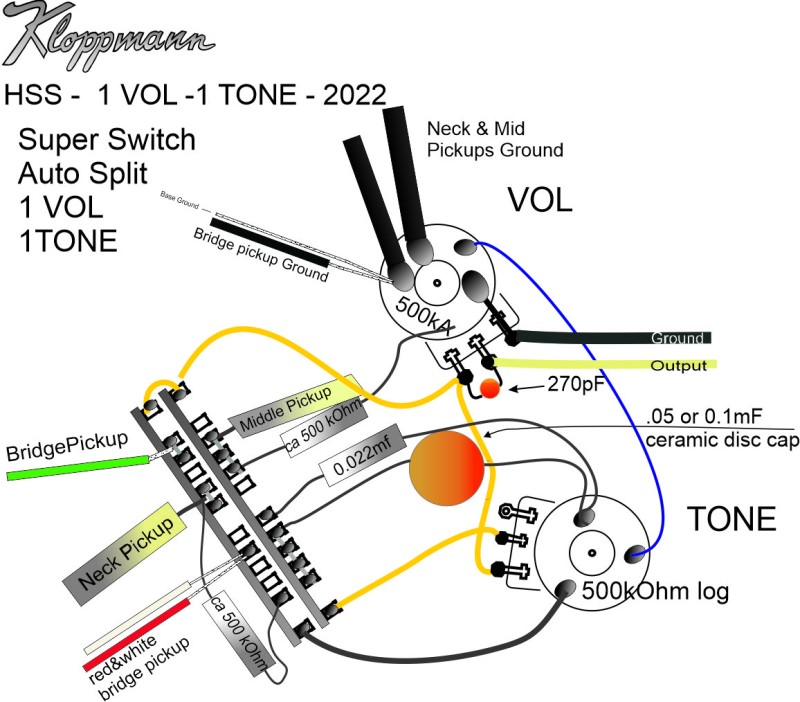
There are many ways to wire an SSH set. Here are three suggestions:
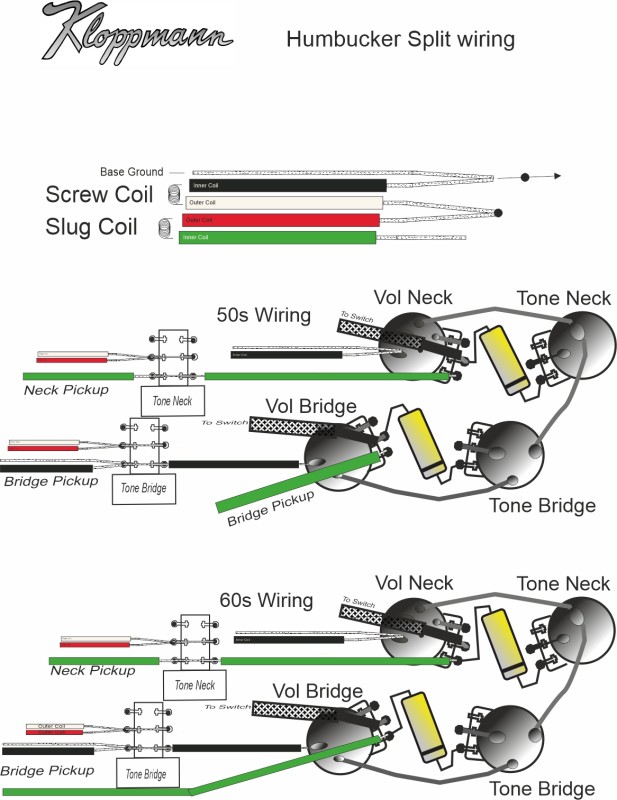
This are the colour codes for the wiring of our 4-conductor humbuckers.
wiring diagramms for jazz and preci bass pickups
Hier unsere Verdrahtungsempfehlungen für Jazz und Preci Bass Pickups
Hier unsere Verdrahtungsempfehlungen für Jazz und Preci Bass Pickups
Hier unsere Verdrahtungsempfehlungen für Jazz und Preci Bass Pickups
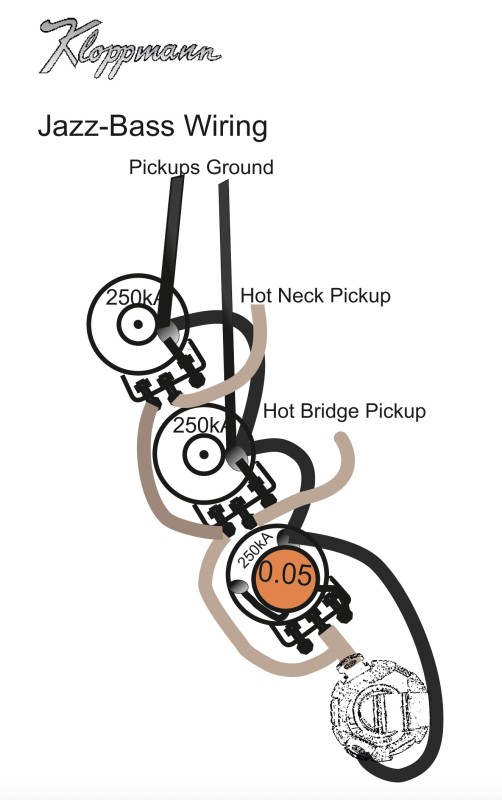
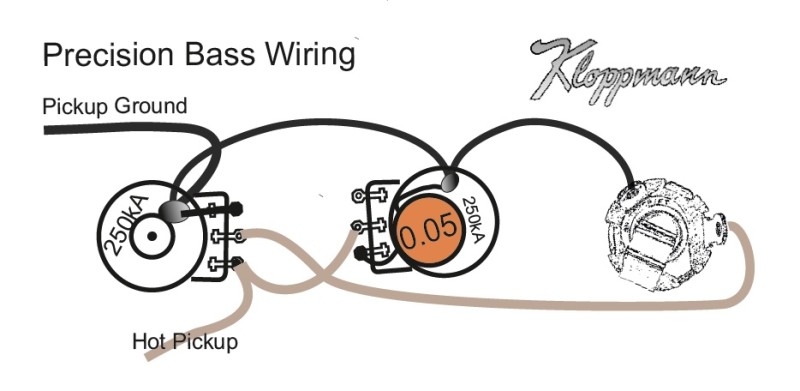
Hier unsere Verdrahtungsempfehlungen für Jazz und Preci Bass Pickups


Hier unsere Verdrahtungsempfehlungen für Jazz und Preci Bass Pickups


Hier unsere Verdrahtungsempfehlungen für Jazz und Preci Bass Pickups


